
Vital Stats
- Manufacturer: Wingnut Wings
- Scale: 1:32
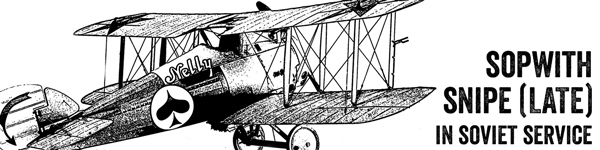
- Aircraft: Sopwith 7F.1 Snipe
- Markings: “Nelly” | Grigoriy Stepanovich Sapozhnikov | 1st Soviet Fighter Aviaotryad | Soviet Union | 1920
- Aftermarket: Gaspatch Turnbuckles
- Paints: Principally Tamiya paints, with some Alclad and Vallejo where needed.

Mini-Review
Wingnut’s Late Snipe is the second biplane – and second Wingnut kit – that I’ve built, and it certainly went easier than the Pup. Overall, not only have my skills and confidence improved in the last two years – so have Wingnut’s detail and engineering. These latest kits – the Snipe, Fokker D.VII and so on – are brilliant. Buy them and have fun.
Aftermarket Verdicts:
- Gaspatch: These tiny metal turnbuckles are a WWI modeler’s dream come true, at least yielding turnbuckles that 100% look the part. I will say though, that the toughness of the metal makes the set with the integrated eyebolts very difficult to use, as bending the eyebolts requires a surprising amount of force. In situations where you want the turnbuckle mounted right up against the wing/fuselage like that, I’d highly recommend just using fine, twisted wire as your eyebolt.
Detail – 5
Wingnut’s Pup was impressive, but the Snipe takes things to another level. Even little items like the Vickers machine gun get better this time around. If you have not partaken of a Wingnut Wings kit, seriously do.
Engineering – 5
Is this really a surprise? Wingnut Wings is known for clever engineering that makes their kits go together with minimal fuss. With the Snipe, Wingnut’s reputation shines through. Heck – I was able to paint most of the aircraft before assembling it!
Fit – 4.5
Engineering without fit just doesn’t work. Fortunately, most of the Snipe fits without fuss. The only areas where I wish the fit had been more assured were the upper deck, over the cockpit, and the cowl. The cowl in particular, was a butt-joint all the way around, where I think a lip of some kind would have really helped assure a proper fit.
Instructions – 5
It’s Wingnut. Their instructions are the best in the business.
Markings – 5
Wingnut Wings’ decals are fantastic, and as usual, their selection of schemes proved interesting.
Wingnut Wings continues to dominate WWI aviation…
![]()
Posts


Photos
Back to COMPLETED BUILDS

Doog,
Looks great, I’m looking forward to building mine! I only see links to parts one, two and the “mini review”. Am I missing something?
You are not. Just haven’t had the time/wherewithal to put the other parts together.
Doogs, that is a masterful and inspirational build. It’s been a long time waiting for the final result but WELL worth waiting for (and no complaints about the wait I might add – it’s been like an extended Christmas Eve). Many thanks from down under.
Fantastic as always. The metallic engine cover is outstanding.
Matt: First, thanks for all your advice here, on youtube, and at SMCG. Great looking Snipe. Can I ask a QUESTION? I’m currently taking my first crack at rigging a biplane (WnW Pfalz D.IIIa @ 1/32). I understand rigging wings fairly well and that’s coming along ok. However, attaching rigging to the tiny horns commonly found on vertical and horizontal stabilizers on the tail has me utterly baffled. On many German aircraft, as here on your Snipe apparently, the rigging appears to emerge directly out of the tip of a bullet-shaped horn (?). How do you create that connection between rigging line straight-on meeting that tip? Wish I could attach a picture to illustrate here but I’m not seeing that capability here. Much thx – Cw