
UPDATE: I’d recommend checking out the Black Basing video:
I’ve never been a big fan of the standard pre-shading, where you trace panel lines in black and then try your damnedest to cover the gray primered areas without completely blowing away all that fine airbrush work that went into the preshade lines. It’s a very delicate balance that, for me, usually just leads to a lot of swearing.
Instead, as I got back into modeling, I picked up what I call the Three-Layer Blend technique.
This is still an awesome technique and a lot more controllable than basic pre-shading. But a few things.
- It’s a crapton of work. Work that may look gorgeous and subtle one moment, but then be completely lost when you start adding additional colors or decals (because adding wildly different colors tends to crush down tonal variation…thanks a lot, eyes).
- You still have to fight the battle to “cover the gray” of the primer.
- Did I mention it’s a crapton of work?
Over my past…I don’t know, it’s been several builds now…I’ve been refining a different technique that basically takes the entire concept of pre-shading and flips it. I call it “Black Basing”.
I’ve found Black Basing to be extremely controllable, a LOT faster than the Three-Layer Blend, and very good at introducing tonal variations, even in pretty basic monochrome schemes. And if you look at actual aircraft, that’s often exactly what you want. Yeah there’s some weathering that aligns with panel lines, but a lot of times, it’s a more random variation than that. And with Black Basing, you can still get that nice panel shading if you want it.
The First Rule of Black Basing
The first rule is simple. Use a black base. You can prime the model, and then paint it black, but I find it’s easier to just use a black primer. My go to is Gunze Mr. Finishing Surfacer 1500 Black, but your mileage may vary.
For the purposes of this post, I’m just going to focus on a current bench occupant, Freedom Models’ 1/48 X-47B.
Here’s the black going down…

And here it is fully primed…


Why Prime in Black?
Two reasons.
First, it makes whatever you’re working on look temporarily extra mean and badass.
Second, it immediately gets rid of the “cover the gray” problem. You don’t have to worry about getting enough coverage to hide the primer, because if you don’t put the paint down as thick, instead of obvious primer peeking through, you get….SHADING!
Adding Color
Now that the black is down, it’s time to add color. And this is where you can really have fun with tonal variation. There are two ways you can go about this, and they can be used together.
The first is paint opacity. The heavier you put on the paint, the more it will cover the black – i.e. the more opaque it will be. Conversely, the thinner you go with the paint, the more black will show through. So just by painting as you normally would on the centers of panels and going lighter over the panel lines, you’re getting basically the same result as panel line pre-shading. But you can also do this all over the surface, for varied, weathered finishes.
The second is color variation. If you’re painting, say, olive drab as a topcoat, you can lay down various browns and greens, heavily thinned, that will subtly change up the color tones of the final coat. Just be sure to thin the olive drab down enough that it doesn’t cover over all that work! And be very mindful of “tonal crush”. A gray jet in low-viz markings will show a lot of tonal variation all the way through, but if you’re adding invasion stripes or brightly colored cowl or fuselage bands or high-viz markings, whatever tonal variation you introduce at this stage will be cut down by as much as half by the time you get to the end of the build.
My X-47 is more an exercise in opacity than color variation, so let’s see how that works in practice.
First, take your paint – in this case Gunze C13 Neutral Gray – and thin it way down. You want to build this effect in layers. Gunze thankfully dries very fast, so all this layer work can be done in a night or two. I typically thin mine about 3:1 thinner-to-paint.
For the first “layer”, I wanted to set up the opacity variation, so I went very small and random. This isn’t particularly difficult since you aren’t trying to get the pattern just so or anything. Actually it’s very good practice for other small-and-subtle jobs like Luftwaffe mottling.
The goal here isn’t to cover the whole thing, but to build in different levels of opacity.

If you were adding some color variation, this is where you would want to do so. Again following the same random distribution (unless you want to represent, say, replaced panels, in which case just focus on those panels, etc).
The Thin Top Coat
Once you have this layer (or layers) in place, using the same very thin paint mix, go wider with your spraying and build up the paint slowly.
If you think about it in opacity terms kind of like the way Photoshop works, an opacity of 0 = black and 100 = whatever your color is. On the first passes, you’re basically ratcheting up very localized opacity. Now you want to bring up overall opacity to something like, say, 70. But work slowly, and with very thin paint, because it is possible to overdo it.
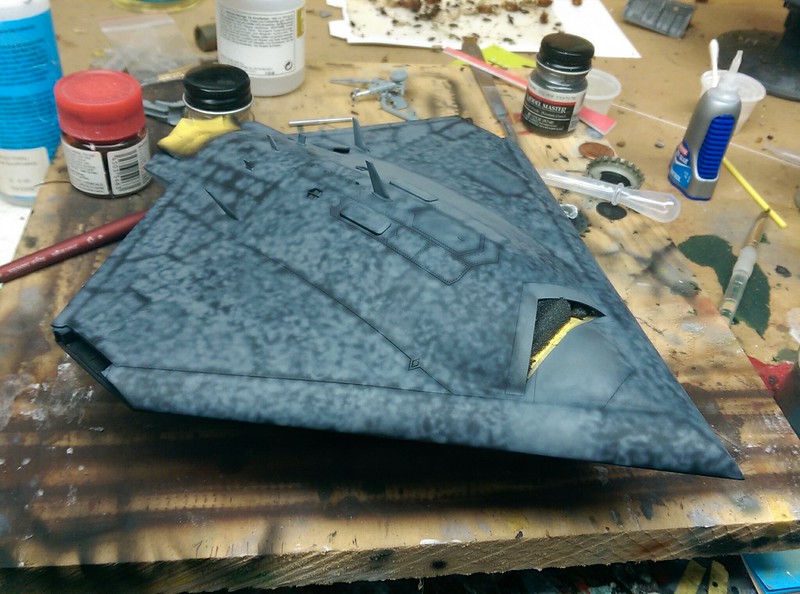
Here’s what the final result looks like:


Overall, I find this to be the best, simplest, most controllable method I’ve found for adding in this variation at the painting stage. If you haven’t tried it – give it a shot!

I had already settled on black primer myself. Hard to reach spots afterwards look pretty much like natural shade.
My base-coating leaves somewhat to be desired, but after reading this I’ll give it a try.
Would like to see more varied examples using this technic.
Nice article Matt. I first read about this technique on Hyperscale a few years ago, as outlined by Rafe Morrisey. I’ve only tried it once, and it seemed effective enough, but you’ve inspired me to give it another go!
I’ve only used this technique 2-3 times in the past and have not on my latest tank build, and I’m finding it difficult to shade hard-to-reach parts very well with colored paints, i.e around suspension & smaller parts – I ended up just shooting most of the model with a very dark shade of green. I think I’ll be more open to using black-basing from here on out… thanks very much for the article and for reminding me of this technique. Looks like I’ll be ordering a few more bottles of Vallejo black primer…
Welcome to how we’ve been painting miniatures for…decades…? 🙂
Darn, now I feel old. :p
Seems like this would be an effective method for those well worn F-14’s.
Very interesting, I have been toying with doing something like this. Back when I was going to Art school I had a class that was in painting using the ‘old master’s technique’. This was using thinned down pigments and layering then over the subject, usually a portrait. These layerings would then give the depth that the masters where known for. It was time consuming, sometime there could be dozen of layers every time the color would become more intense and the shadows becoming more complementary to the subject colors.
Very interesting. I’ve a couple builds on the bench I’ll try this on.
Thanks!
Very interesting. I’ve a couple builds on the bench I’ll try this on.
Thanks!
very cool. i just finished a tamiya 1/48 spitfire, and even though i’m pretty new to the game, i’ve been suspicious of standard preshading from the jump. it’s just not supported in the real world, at least not to the extent you often see. it’s sort of like the hdr photography fad…people sort of apply a rote technique without much creative forethought and the results are often comical.
This is the first time I’ve heard (read) about black basing. It seems that using this thechnique I can achieve the color variation I was looking for. I will give it a try on my next model! Thanks for sharing!
I’m curious if you’ve tried the reverse when the final color is a darker color, I.e. an F4U-1D in overall dark sea blue – prime with a gray color and build up the dark sea blue?
You can also white base and get a different result. White basing works really well in areas that will end up needing lighter colours, if you black base a light colour area it tends to darken the final colour requiring more paint to cover the black so masking the primer layer between black and white bases can also save you a lot of time and paint. Figuring painters do this alot and when you paint your house you usually put down a white undercoat with light colours to stay true to final colour.
Black primer? Please explain. Is primer just really paint? I been black basing all parts for a while now and yes it’s a far easier and better result tequnique. I just use tamiya X1 gloss black heavily thinned. This way I get the black base we are after, don’t loose any rivet and line detail, and get a nice smoth glossy finish without all the dreaded dust you get from using a flat based paint such as tamiya XF1. So back to the question is black paint really a primer. Is primer more referring to the step in the paint process rather than the product? Tip: I’ve been adding acrylic gloss, tamiya X22 or future to my XF tamiya paints, this eliminates that dusty finish you can get when using flat finish colours. By adding say 25/25/50 paint/acrylic gloss/isopro alchole you get a satain – gloss finish good enough to take the decals. Question: is there a better product to use than isopro alcohol for thinning Tamiya acrylics for airbrushing and cleaning?
Yes. Thin Tamya acrylics with Tamiya X20A. Its made to do just that.
Best thinner for acryllics Tamiya is.. Tamiya acryllic thinner X20-A or Laquer.. However! If its hard to some I use a mix of isoprop alco, distilled water and pharmacy glycerin. For me its 60/35/5 for alco/water/glycerin. Its uber cost effective, and yet, well working replacemnt for x20-a.
Adding gloss into tamiya flat paint is a real cure, but I, personally, switched to gunze sangyo paints which work MUCH better for me. Some say gunze has smaller pigments and its not that sandy matt as Tamiya.
Good luck
How bad is isopro alchole for our health when using it in our hobby? Fumes and on skin ect. I seem to get a headache after a few nights on a kit when using it. I have a fan blowing fumes out the window too.
Hi, Just got back into modelling and found your black basing technique. Just put down the top layer of grey on my MDC Typhoon and got to say, love the effect. Looks a lot better than I remember any of my painting efforts in the past. Thanks, Chris
This is fantastic. I’m building the Italeri 1/48th V-22 Osprey which is a low viz ghost gray. I have the panel lines sprayed but I’m going to scrap it and just prime the whole thing black using the technique above. I’ve been looking for years to get this accurate representation when finished. The marble coat really makes this happen. Most Navy/Marine planes will greatly benefit from this. Your Skyhawk shows this. Thanks for this. Do you marble and finish equally with enamels and acrylics? I find that getting real FS colors requires me to use MM enamels, like on my Osprey, The MM enamels are exact FS numbers and the Tamiya acrylics are nowhere close.
Well, I don’t really use enamels outside of selective weathering applications. These days my preferred paints are either lacquer (Mr. Paint, Gunze Mr. Color) or alcohol-based acrylics like Tamiya. Gunze and MRP are both quite good at going after FS, RLM, AMT and other color standards. Of course all brands have their hits and misses in terms of color matching, but I’ve found Gunze and MRP to be pretty solid for the most part.
Hi Matt,
Question! how low do you drop the air pressure to get real close while doing the marbleing/mottling thing?
Anywhere between 10 and 20 depending on the paint, what I’m doing, ambient temperature, humidity etc
Thanks a lot, Doog for all the hints and pictures you share with us.
It is very helpfull and motivating
Love this technique and I’m trying to get good at it. A couple of quick questions…
In the post you say thin the paint 3:1 Thinners to Paint for both the Marble Coat and Blend Coat, but in the Video you go from 2:1 or 3:1 for the Marble Coat to something like 7:1 for the Blend Coat. Which option would you recommend?
What airbrush/needle size are you using for the Marble Coat?
And finally, thanks to your review I’m also now using Mr. Paint which I love, it just sprays like it feels paint should spray! However, I find it perfectly thin without thinning it, so should I still thin it 3:1 for the Marble Coat etc.? What thinners do you use for Mr. Paint?
Thanks for all the great content on here!
Hi I was wondering does this technique have the same effect on 1/72 scale aircraft?
1/144, too! https://doogsmodels.smugmug.com/172-Scale-Aircraft/1144-Bandai-T-65-X-Wing/i-QQ2MT2m
I’ve just tried this for the first time resurrecting a 1/48 Rafale which has lain unloved for many years. I confirm that it most definitely does temporarily make the Rafale extra mean and badass. But even better, the overlying grey coats now look like actual real-life paint with gentle variations across the aircraft’s skin. I love it. Thanks for introducing me to the technique. Just took me a few years to see this post and try it!
Hello Matt,
I saw you several times on your videos, using GX2.
What would you recommend to obtain a shiny finish with an airbrush?
My first use with a ratio 50/50 with Mr color thinner gave me shiny but rough finish.
I layed two normal coats with 1 minute between each.
Thank for your advise and keep going with your channel. Your work is very interesting. We don’t have such YouTube channel in France 🙂
Best regards,
Olivier.