
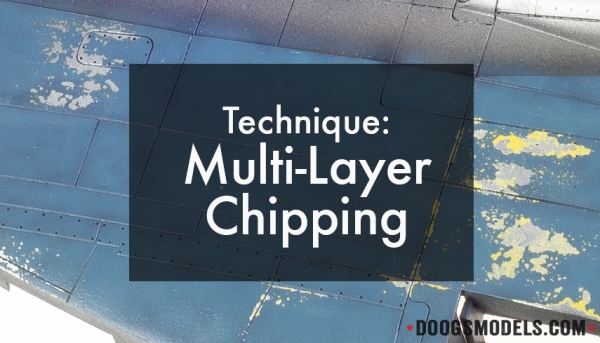
I’ll straight-up admit it. I’ve been procrastinating on my big Tamiya F4U-1 Corsair. Oh, sure, part of it’s been working on other builds, but a bigger part has been sheer anxiety over how I’m going to paint the thing.
The problem is pretty basic, really. I have a pretty reliable painting process that puts a lot of variation into potentially monochrome schemes – a must for a worn, faded, battered Marine Corsair serving in the South Pacific. I also have a need to introduce some fairly aggressive chipping and worn paint effects – a need that my black-basing process doesn’t really make provisions for.
I knew hairspray or some other kind of chipping solution would play into the answer, but how, specifically?
I decided to do a little experimentation to sort that out.
The Goal
The goal here is simple. Preserve my Black Basing technique, and incorporate chipping to show both primer and bare metal beneath.
Step 1: Prep for Alclad
To carry out my experiments, I pulled out a scrap fuselage that I’ve been using as a paint mule for a while now and gave a portion of it a nice coat of Gunze Mr. Surfacer 1500. Now, this isn’t the ideal base for Alclad, and if I were building a bare metal aircraft, I’d opt to put it over a gloss black. But we’re dealing with chipping and bits of metal showing through, so who cares.

There, a nice, good enough base to work from!
Step 2: Bare Metal!
With the base in place, it’s time for some bare metal. I opted for Alclad Aluminum, mainly for durability, but any metalizer will work including Gunze Super Metallics, Tamiya AS-12 Bare Metal Silver, and so on.

Step 3: Hairspray
Once the metalizer is set, cover it with a coat or two of hairspray or the other chipping medium of your preference. I use cheap stuff I bought at Target, but I’ve got some AK Interactive stuff and it works rather well, too. It all depends if you want universal or targeted chipping, I think. Hairspray is more a “bomb it on” affair.
With hairspray, give the surface 2-4 quick, passing coats. The more coats, the easier it’ll melt and chip, so go for more if you want to expose a lot of bare metal.
NOTE: Hairspray/chipping fluid application is still, to me, the most opaque part of this process. It’s hard to truly tell how much or how little to use. I recommend testing a few different application methods and, of course, refining over time based on what works for you.
Step 4: Spray Your Top Color
Once the hairspray sets (read: quickly), go ahead and spray your top color. Remember that this chipping technique more or less requires an acrylic paint to work. Again, it doesn’t hurt to test the process on scrap before committing to an actual build.
On my Corsair, I want the primer showing through the worn paint, as well as the bare metal. And reference photos indicate that the exterior skin of the F4U-1 was primed in zinc chromate yellow, not the salmon-tinged color applied to the interior surfaces. Tamiya just happens to make a reasonably good match for chromate yellow – XF-4 Yellow Green.

I opted for light, sporadic coverage. The surface is going to be chipped anyway, and then covered with more paint. So no need to get all perfectionist here.
Step 5: Chip It!
Chipping seems to be one of those techniques that causes a lot of freak-out among modelers. But really, it’s not that bad. I swear.
It helps to understand the underlying mechanism. Hairspray is water-soluble, even after it’s dry. This is ostensibly so people can wash it out of their hair with ease. In modeling terms, it means you can create a paint foundation that you can easily undermine if you choose to.
The actually chip paint, all you need to do is take a brush and some water. Get the brush wet, wet the paint surface, and start “sweeping”. Soon enough, the paint will begin to chip as the water absorbs into the paint and melts the hairspray underneath. You can use a big brush or a small brush. Stiff or soft. You can even use sponges and toothpicks and steel wool.
Beyond that, it’s really an exercise in control and restraint. As TankArt author and amazing modeler Michael Rinaldi says, “you can never have a chip that’s too small”. Or something like that. I’m probably paraphrasing. It’s very easy to overdo it, and half of learning the technique is learning when to stop.

For my experiment, I took the opportunity to play around with a few different techniques. Most of it will be buried, so there’s no harm in mucking about in the name of experience.
Step 6: To the Test
Single-layer chipping is pretty straightforward. But the thrust of this experiment was to sort out multi-layer chipping. So at this point, the test surface got split into three areas.
- AFT: The aft portion of the test surface received an additional coat of hairspray on top of the XF-4 Yellow Green.
- MID: The middle portion received a sealing clear coat of Gunze Semi-Gloss, and then a coat of hairspray.
- FORWARD: The very forward portion received a sealing clear coat, and no hairspray. In TankArt 3, Rinaldi talks about another technique for paint-wearing that involves using a Windex-water solution to “thin” paint down in a realistic way. Call me curious.
Step 7: Back to Black
FINALLY, we’re back to a good black base to paint from. Given chipping’s acrylic requirement, I used Tamiya X-18 Semi-Gloss Black this time around.

Step 8: Time for the Blues
My Corsair is going to be getting the USN Blue Grey treatment, but for the purposes of this experiment, I opted to be lazy and use XF-18 Medium Blue as my stand-in. Seeing as it will make up something like 80% of my Blue Grey mix, it’ll do. This was airbrushed on in a quick-and-dirty version of my black-basing technique.

Step 9: Moment of Truth
Once the blue had a few minutes to set up, I started chipping. Once thing I found was that the chipping was a lot finer this time around, with fewer giant flakes pulling loose. I don’t know if this is due to the two layers of paint, or due to different hairspray application or what. Over time I’m hoping to get a better feel for the cause/effect relationship.

I think the results speak for themselves, but in case not:
- AFT: I’ve experienced it in the past, but this was pretty definitive proof that you absolutely need to seal a color you’ve chipped if you plan to chip another color on top of it. While the chipping aft came off rather well, the XF-4 Yellow Green came off as well.
- MID: Just about perfect. The lacquer clear coat created a great seal that protected the XF-4 and allowed it to show through the chipping. Additionally, there was not a single instance of the blue chipping away while leaving the black behind.
- FORWARD: Total failure, for now. The water/Windex solution did nothing at first. Then a stronger, Windex-leaning solution ate right through the blue, black, clear coat and XF-4 all the way down to the Alclad.

So there you have it. For multi-layer chipping, be sure to use a non-acrylic clear coat to seal between layers. Now…on to the Corsair!

Nice effect. Going to have to steal some of my wife’s hair spray this weekend…
I have been looking for a trial like this. I have a warrior apc that i wanted to do this muli level wear on but had no idea how to go about it as it has four levels – base metal,zinc chromate, green, then desert yellow.
Ill also give the black baseing a go on the flanker i am doing. I have the faded akan paint set so this may be the better solution for panel variation instead of lightening an already faded paint over preshaded panel lines. So a big thumbs up for solving two worries in one post!
Hello
Good explanation good effect.
While I urge all to do always their own experimenting, I’ll admit I’ve not been taking much time to actually do some. It’s a real help to get it spelled out in this much detail. Saves a lot of time and frustration. Great article, thanks!
Thanks for putting this all together in a nice, coherent blog post Matt. I think I get it now!
Excellent write up, glad to have another trick to try out on a kit here in the near future! Always an inspiration seeing your work.
Would it make sense to cover the aluminum layer with a lacquer clear coat so it does not chip away, showing black? I only ask because I experimented some with this technique and I may have gotten a little carried away and got some of the black showing through. What are your thoughts on this? I am wanting to do this technique on the deck of a 1/32 UH-1 Huey.
And I just answered my own question. I guess I did not realize the alclad was lacquer. I just used some Tamiya silver paint and that is why it also came up with this technique.
Thank you for the info above! I recently tried this three level chipping and really like it. But one issue is that paint with a hairspray layer does not mask well; the paint under the tape can pull right off even if the whole area is under a sealing coat. Now I just use chipping fluid in those areas where the chipping is needed and make sure that it does not get onto areas where masking will occur, and I brush it on to prevent overspray.