

With each new build, I try to push myself outside of my comfort zone (RELATED: Where the Magic Happens) in at least one area. Test a technique. Try a new paint. Experiment a little.
But every so often, a build comes along that’s more than that. That kicks me into an entirely new level of modeling.
Tamiya’s 1/32 F4U-1 Corsair is definitely one of those builds.

This kit has been, hands down, the best I’ve ever touched. It makes other good kits look decent at best. I knew even before I started building it that I wanted to give it a paint job that would match the awesomeness of the kit. I actually procrastinated for some time, unsure how to approach what I had in mind, until some experimentation showed me the way.
Step 1: Primer
The first step in the painting process is priming. For reasons I’ve gone into at length before, I prefer to prime in black.
My primer of choice? Gunze Mr. Finishing Surfacer 1500, sprayed through an airbrush.

Step 2: Prep for Multi-Layer Chipping
Marine Corsairs operating in the South Pacific had to endure grueling conditions. A hellish sun, high humidity, the corrosive effects of the salty sea air, constant exposure to the elements, and scouring from the sand and crushed coral they operated from. This meant that paint faded…and chipped.
I wanted to represent the chipping…but not just to bare metal. I wanted bits of chromate primer peeking out, as well. And that required getting a bit creative.
First, I laid down my bare metal. In this case, Gunze Super Fine Silver.

Next, I sprayed a layer of AK Interactive Worn Effects chipping fluid. Over that went some Tamiya XF-4 Yellow Green, which does a great impression of yellow zinc chromate.

After spraying the XF-4, I attacked it with a brush dampened with water. This has the effect of “melting” the chipping fluid, and giving the paint atop it no purchase, so that it flakes away. I was intentionally rough with this layer since most of it would be covered up.

When I was done, I sealed everything with a coat of Gunze Semi-Gloss Clear, then applied another coat of chipping fluid.
Step 3: Chipping
I wanted to maintain the black-basing effects for the main paint job, so I started by going over the painted areas with Tamiya X-18 Semi-Gloss Black. Then went over that with a custom mix of Tamiya paints to represent the USN Blue Gray that the early Corsairs wore.
If you’re interested, here’s the formula:

I lightened by Blue Gray with some white and then went to town, painting in my usual manner of tight, random “marbling” followed by more general blending coats.
This was then subjecting to the same chipping procedure, but far more carefully. In reality United States aircraft were not all that prone to extreme chipping the way, say, Japanese aircraft were. I also kept it localized around high-traffic areas.

Step 4: Tonal Variation
Though my painting technique was introducing a lot of interesting depth to the Blue Gray, I wanted to go further with lighter coats on the fabric surfaces and some darker Blue Gray on one of the ailerons, perhaps to represent a replacement. This was achieved in the former by adding more white, and in the latter by just not lightening my base mix.


Lastly I finished up the Light Gray undersides, repainted the tail, and sprayed the leading edges of the wings with unlightened Blue Gray, representing a touch-up job.

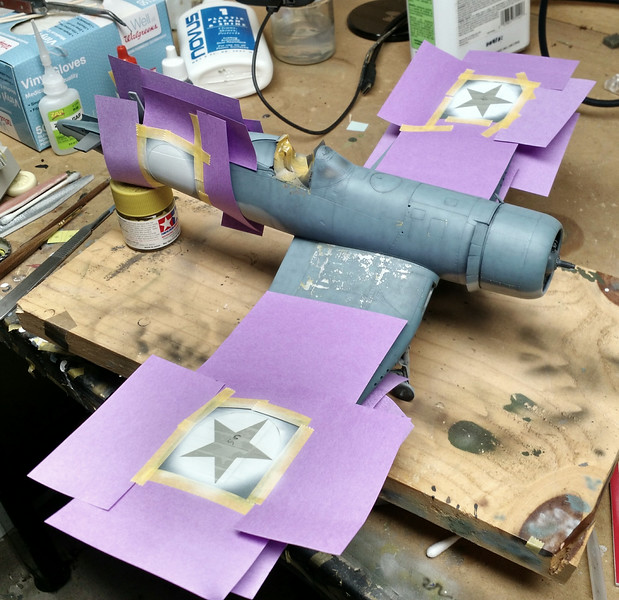
Step 5: Insignia Masks
I decided a long time ago that the main markings on this aircraft would be masked and painted. When you get into 1/32 sizes, it looks far more realistic than decals, and there’s no silvering or carrier film to fuss with.
The masks I used were from Maketar. They have a lot of ready-made sets based off actual kit decals, as well as several sets of standalone markings.
The vinyl masks for the roundels were placed first…

Then painted with Gunze C69 Offwhite.

Next, I placed the stars inside the roundels, and painted them with Gunze Insignia Blue.
Voila!

“Tojo Eats Shit” was one of a number of Marine Corsairs that carried non-standard markings. In January 1943, units were ordered to paint bar extensions to either side of the insignia, and then to surround the entire affair with a red border. New aircraft shipped from the factory this way, and deployed units complied as they could, when they could. But in the field, resources can be lacking, and priorities elsewhere. I’d guess that’s why you see pictures with the bar extensions but no red surrounds.
Another curiosity is the presence of these markings at six points. Later aircraft only carried four insignias on the sides, upper port, and lower starboard wings. But these early Corsairs went into battle with the earlier six-point arrangement.
I masked these off based on the extensions provided with the Maketar mask set for the red-surrounded insignias. Tape was laid around them, then they were removed. Again, Gunze C69 Offwhite was used.


Step 6: No Walk Lines and Non-Slip Walkways Masks
I generally hate decals, but I reserve a special hatred for no-walk lines. They’re thin, prone to tearing or settling down less than straight or silvering even as all the decals around them lay down perfectly.
So when I saw that Maketar’s masking kit included the lines, I leapt at the chance to paint them. This resulted in another case of “subtractive” masking.
First, I placed the lines themselves, then I masked around them, and finally pulled them up.

The no-slip walkways in particular I wanted to show as scuffed and a bit faded, so I went with a dark gray, then attacked it with a wet, stiff brush as soon as the masking was pulled away.

Step 7: Stencil Masks
The final bit of masking involved the fuselage “126” codes. Despite my desire to lay all three numbers side by side, I found it easier to place and spray one at a time.
To speed the process, I made a masking frame out of a post-it note. This allowed me to place the mask, place the frame, and spray very quickly. The result? Got all the numbers done in maybe an hour.

Here’s the Corsair after all the painting, as well as a gloss coat and a few decals.

Stay tuned for the next Corsair post, which will walkthrough the process I’ll use to beat the crap out of weather it…

That is just epic! I have that kit and am happy to hear it’s the best you have seen so far. Tempted to try some of your techniques but also terrified! Haha!
Amazing job so far. Maybe your best yet?
Another masterpiece!
whole other level. great read. worth the wait. Corsair is my favorite plane
Thanks
Outstanding work.
The worn areas are just right to my eye. Well Done
6 stars & bars …. thats a new one …no seriously never seen that on a blue grey F4U -1 /1A..or even a tri colour of any type
Not saying its wrong but certainly different …i always thought when here was 6 roundels it was at a time pre dating the addition of the bars ..(have seen many F4U’s with six roundels only no bars) .as when the bars where 1st introduced.they had a red border then this was changed to dark blue…which itself was dropped as by this time most aircraft where the darker blue anyway …
Yes I’m well aware of the official insignia changes – and that there are frequent aberrations from the official orders and timelines. For example, many of those red borders were painted over before orders came down and others were never painted in the first place.
As for this particular aircraft, there’s photographic evidence of VMF-222 running six insignias into 1944… https://ww2db.com/image.php?image_id=22782
That said, a lot of this scheme and what’s going on is conjecture based on a few shitty photos. I’ve parsed as best as I could and ultimately went with what seemed both possible and most visually interesting.
Wow
You must be a process engineer
What a clear and concise instruction set right down to the custom color mix. I’m about to build Tamiya’s 1/48th scale little brother. I’m going to give your method a try.
Well done Doog!