

Vital Stats
- Manufacturer: Revell
- Scale: 1:48
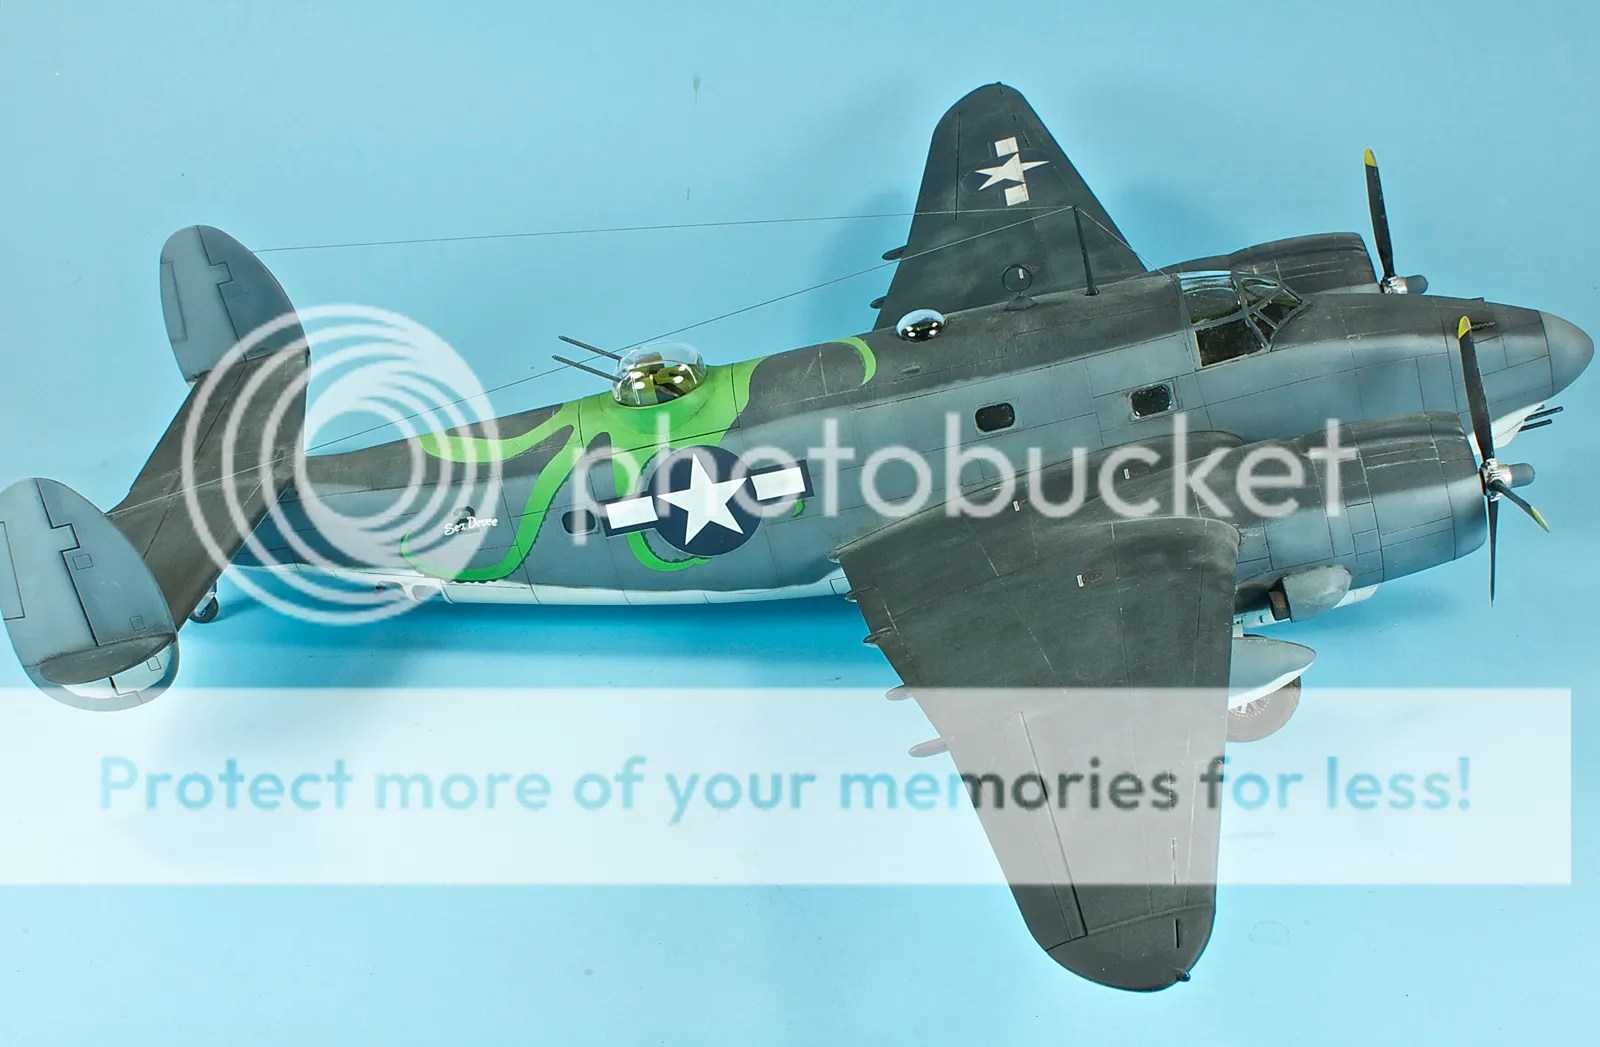
- Aircraft: Lockheed PV-1 Ventura
- Markings: “Sea Deuce 2” | VPB-133 | Iwo Jima | Late 1944
- Aftermarket: Quickboost .50 caliber machine guns | Ultracast tires | Vector propellers | Lone Star Models exhausts | Zotz decals | Maketar paint mask (for octopus) | MV lenses
Mini-Review
Back in the 1970s, Monogram and Revell released a string of big bombers in 1/48 scale, from the medium bombers like the B-25 up through the heavies, including the B-17, B-24 and B-29. And then, the whole big bomber thing kind of died. Tamiya made a Lancaster, Accurate Miniatures did a run of early B-25s, and little else happened. Today, if you want to build a 1/48 bomber, you’re often as not limited to the same selection of 40-year-old molds.
In recent years, though, the tide’s been turning, and the big bombers are back in vogue. To me, that’s the big deal about Revell’s PV-1 Ventura. Sure, it was only a light patrol bomber, but it’s also their first twin-engine bomber in a long time (since the A-26 Invader, I believe).
How is it? Fantastic, especially for the pricetag of around $30. Detail is soft in some areas, and the fit is awful with a few of the smaller bits like the gear bay doors, but overall, this one’s a winner.
Detail – 3
Detail overall is quite good – particularly the surface detail. It could be a bit crisper in places – the crew door in the port side of the fuselage feels a bit soft, for example. Where the detail falls apart is in the little things. The tires and machine guns are awful, and the cockpit lacks the business present in pretty much every WWII aircraft.
Engineering – 5
While the detail may be soft in places – at least soft for a new-tool kit – the engineering is top notch all the way. Everything is designed to go together logically, and it’s almost impossible to get it wrong.
Fit – 5
Smart engineering is one thing, but it all falls apart if the fit’s not there. Fortunately, the PV-1 is a paragon of great fit. The wings, in particular, seat into the fuselage along an internally-braced wingspar, and they fit so well that you can paint them separate from the fuselage. Likewise, the tail snaps into place with authority and no need to glue or fill.
Instructions – 3
The instructions are easy to follow, but don’t go into the detail I would like. For example, the gear bay doors have a rather vague fit, and the instructions offer no insight on how “deep” to mount them. Painting instructions are also too broad for my taste, particularly with detail items.
Markings – 3
I didn’t use the kit markings, but my main gripe is with the octopus design. Revell turns this into like four different decals, which just begs for obvious seam lines. If I were them, I’d have done this as a paint mask and charged an extra $5 or so.
RECOMMENDED
![]()
Posts
Build Log 1 – Cockpit + Main Assembly
Build Log 3 – Markings + Weathering


Photos
Back to COMPLETED BUILDS

Great work. Very nicely done. A bit of history–my father (Aviation Radioman) flew with VPB-150 out of Tarawa and TInian from July 1944-March 1945. VPB-150 were the Devilfish P-Viators, with the Devilfish (Octopus) over the .50 cal turret. His PV-1 Ventura was number 893, flown by Crew 2 or “Sea Deuce”. I have pictures with him standing by the “2” with “Sea Deuce” imposed over the “2”. Where did you find a picture of that loco? I am going to build the same model and would like to duplicate your Sea Deuce decal and use the number “893” instead of “895” that came with the model. I also want to add the name “Beverly Jean”, who was the pilot’s wife and also appeared on the actual plane. Any ideas on how to do that? My father flew 55 combat missions, mostly in 893. Apparently the planes were turned over to VPB-133 when 150 was rotated home, and were then flown out of Iwo Jima, although the Navy’s official history of these squadrons does not so indicate. Look forward to hearing from you.
Thanks for the comment and extra history, Steve! The markings I used for this build are from the Zotz decals sheet for the PV-1. Sea Deuce 2 is included in the scheme options – I’m 95% sure that the markings were drawn from a photo in the Squadron PV-1 Walkaround book, which is probably the same photo you reference.
For the number, the Zotz sheet unhelpfully did not include one, but you could recreate by grabbing one of those decal sheets with various numbers and letters, or you could reach out to a paint mask company like Maketar (who did the octopus mask I used) to see about getting some proper numbers made up. Getting the pilot’s wife’s name might be more of a challenge…if you have an image of it you could probably get a mask done for it, too, unless it’s something really complex.
Hope that helps!
Hello:) Did you use airbrush on all of the plane ? You do many great works. My self I do only 1:48 ww2 planes, painting old time way, with humbrol and brush .
Thanks! Yes, I airbrush just about everything I can. I’m hopeless with a brush…
Congratulations on this awesome work! I have bought this kit and was doing some research on it when I found your website! Can you please give me some lights on the weathering you have done?