
PART I | Part II | Part III | Part IV
As I was nearing the end of my long Trumpeter P-47 build, I was chomping at the bit for something quick and easy. A palette cleanser before diving into another ambitious project.
Then I got laid off.
The last time this happened, in the summer of 2011, Tamiya’s 1/32 Spitfire Mk.VIII went a long way toward keeping me sane during the ensuing job search. So I decided to pull another ambitious build out of the stash – Wingnut Wings’ newly-released Sopwith 7F.1 Snipe.

Without going too deep into the history (may I introduce you to my friend Google?), the Snipe was to the Great War what the Grumman F8F Bearcat or Vought F4U-4 Corsair were to World War II. In other words, a highly-capable successor to serving aircraft that arrived right at the tail end of the war, too late to really contribute. Like the later Bearcat and -4 Corsair, the Snipe went on to see spotty postwar service as more advanced aircraft and more advanced powerplants pushed the rotary-engined biplane into obsolescence.
The particular Snipe I’ll be building has an interesting backstory.
In 1919, the RAF dispatched twelve Snipes to serve on the side of the White Russians during the civil war against the Bolsheviks. At least one of the Snipes – E6351 – was captured in Poland and pressed into service by the Soviets. This Snipe was attached to the 1st Soviet Fighter Aviaotryad and flown by ace Grigoriy Stepanovich Sapozhnikov until an engine failure in September 1920 killed Grigoriy and destroyed the Snipe.

First Impressions
This isn’t my first Wingnut rodeo. About two years ago, I tackled their 1/32 Sopwith Pup and found it to be an exceptional, if demanding kit. On cracking the Snipe’s box, it was immediately apparent that they have not been sitting on their hands. Everything about the Snipe is a bit crisper, a bit more defined, and in some places a bit better thought-out. The evolution between the two kits is most apparent in the Vickers machine guns, which I found to be one of the few weak points of the Pup. On the Snipe, the distinctive ribbed jacket of the Vickers is molded in two halves, allowing for a hollow opening not present on the Pup’s lone machine gun.
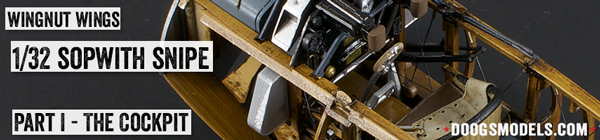
The Cockpit
As with most aircraft, this build begins in the cockpit.
Prep for Bracing Wires
When I built the Pup, I foolishly did all the wood graining first, then tried to go back and drill holes for the cockpit bracing wires. Having been around the block once before, this time I knocked out the bracing wires first thing.
The Snipe’s cockpit sides, like the Pup’s, are difficult to navigate with a drill of any kind, so I used my trusty old Iwata 0.35mm needle to punch the necessary holes.

With the holes made, I moved on to the wood graining.
Wood Grain Effect
Replicating wood grain is one of those things that sounds terrifying at first, but once you do it once, it’s a walk in the park.
Step 1: Lay Down Your Base Color
Since the interior wood is relatively light-ish, I started with a base of Tamiya XF-59 Desert Yellow. The brand doesn’t really matter, so long as it can withstand oil paints.

Step 2: Apply Your Oils
This part’s easy! Load up a brush with some artist oil paint and paint it on. For this step, I’d recommend using Raw Umber, but depending on the wood look you’re going for, or the darkness of the base color, you can certainly vary your oil shades as needed.

Step 3: Scrape the Grain
Replicating wood grain is as easy (and as hard) as scraping away the oil paint you just applied. Personally, I favor using the black packing foam that comes with many aftermarket accessories (such as Aires sets and Eduard Brassin products). Take said foam and drag it across the “wood” to create a streaking grain effect. If you want you can even jink the foam a bit to create some waviness in the grain.

For smaller sections where the foam won’t work, you can also make due with a stiff brush.
When you’re done scraping, you’ll end up with something like this:

Step 4: Varnish It!
Next, apply a coat of Tamiya Clear Yellow or Clear Orange (I personally use a mix of the two). This will replicate the shiny, varnished look found on most Great War aircraft. Mind you – it might look out of place on say, fence posts.


And that’s all there is to capturing that woodgrain effect. Seriously, it seems daunting as hell until you try it. And after that it’s a breeze.
Rigging the Bracing Wires
Once all the woodgrain was down, I moved on to the bracing wires. For these I used 0.3mm EZ-Line and some short lengths of Albion Alloy 0.5mm silver-nickel tubing that I had left over from my Pup build. For something with a more exposed cockpit, I might consider upgrading to the fancy new Gaspatch turnbuckles, but the Snipe’s cockpit opening is very small, so why bother?
Rigging the wires was as simple as dipping an end of the EZ-Line in CA glue, then shoving it into one of the holes I’d made at the outset. Once once side was fixed, I threaded on two lengths of tubing, then fed the other end of the line through the proper hole, CA’d it in place, then glued the tubing down at each end. This was way faster than the monofilament “bolo” technique I used last time around. All hail EZ-Line!

Once the lines were in place, I painted them with Model Master Metalizer Dark Anodonic Gray.

Painting Things
Next came the fun task of painting, well, the rest of it!
After masking and painting the rest of the interior (Alclad Aluminum ahead of the wood paneling, Tamiya XF-55 Deck Tan aft), I painted the cockpit deck and sides with a base coat of black, and then went over them with Tamiya XF-82 RAF Ocean Gray. The oil and petrol tanks got the same treatment, as did the frame for the Vickers guns.

The wicker seat was painted with Vallejo Khaki and detailed with Vallejo Flat Black and Leather Brown, with a raw umber oil wash and some Model Master Dunklegrau drybrushing on the leather cushion. The belt is the photo etch one that comes with the kit. this was annealed (i.e. held over flame) to soften the brass and make it easier to bend. It was then painted with Tamiya XF-55 Deck Tan and given a heavy raw umber wash.

The metal elements – the rudder pedals, control stick, etc, were painted with Rub ‘n Buff Silver Leaf, then buffed with Hawkeye’s Aluminum Polishing powder and a Dremel cloth wheel. Black was covered with Liquitex Carbon Black acrylic ink. This stuff is very thin, doesn’t obscure detail, doesn’t run, and dries to a sheen that somehow really evokes the enameled-metal look of the real thing. Copper and brass metallic paints were used on various wiring and tubing. Finally, the Vickers guns were painted black, then drybrushed with Model Master Metalizer Magnesium.
Kit decals were used to finish things off on the instrument panel…the various gauges are cool, but to me the real standouts are the decals representing brass data plaques. So cool looking!
More EZ-Line was used for the control cables routing under the cockpit frame – there’s a nice little add-on piece beneath the seat and the tank it rests upon that allows you to easily route the cables aft with proper spacing, but really once you get to the end of the cockpit frames, you can just snip everything off since it will be invisible anyway.


A Word About Assembly
The Snipe’s cockpit is remarkably well-engineered and is indeed a press fit. However, there are a LOT of parts that have to be pressed, and that can really complicate matters. I’d highly recommend using some sort of white glue (I prefer Gator’s Grip) on the inside of the cockpit just to get some hold, then using CA on the outside (all the mounting holes are open) to really lock everything in place.
Up Next…
And…the Snipe’s cockpit is done! Coming up next, insanity! No, seriously. Biplanes are weird beasts, and the nature of the build process literally screams that massive blocks of the actual painting be done before assembly. So Part II will focus on the pre-painting that has to go on before true assembly can begin. Stay tuned!
PART I | Part II | Part III | Part IV

Glad to see you’re back Doog’s. Sorry to hear about your job man, that sucks! This is awesome work on the model as usual, I never tackled wood grain before but you sure make it look easy which boosts the confidence of other guys contemplating the effect! I’m separating from the Military in a few days and moving to Austin got any tips for the area?
Tip – you will become a denizen of whatever enclave of ATX you move to and look down on the other “Austins” (central (UT + downtown), north (suburb hell), west (rich white people), east (gentrification) and south (hippies)), so choose with care!
Damn.. That’s a hard choice, I’m fresh out of the NAVY so I’m pretty squared away… need some thing close to Camp Mabry to do drills, build models and find a JOB! LOL Thanks!
Doogs really sorry to hear about the job situation. Hope that turns around for you real soon.
The Snipe Pit looks great and it’s good to have you back online! I just ordered the WNW Fokker D.VII (Fok) so that should be fun! Working on their Roland D.VIa right now. Great kit! I like your simplified rigging idea. I’ll test both methods when the time comes.
Cheers and good luck to you
Andy
Also – glad to see your back. Good luck with the new job hunt….better times ahead
Congratulations for your job. It’s amazing. And thank you for sharing your tips and your pictures.
I am following the build of the snipe. There is a problem though. I can’t navigate to page II. The links at the bottom of the pages seems not to work. Is it possible to fix that wo that I can learn and enjoy your pictures to help me building my own Snipe.
Thanks again
Steve
https://doogsmodels.com/completed-builds/completed-builds-aircraft/completed-builds-132-aircraft/sopwith-7f-1-snipe-late/