

After the painting (LINK) comes the fun part – the weathering!
No Clean Bird
Marine Corsairs weren’t exactly known for their cleanliness, and “Tojo Eats Shit” has to be one of the filthiest examples I’ve yet come across.

There are so many factors at play here. Fading. Chipping. Gun and exhaust stains. Coral dust. Oil stains. All in all, it adds up to one thing:
Tons of weathering.
Let’s get started.

Coming out of paint, the Corsair is already pretty weathered up through a combination of multi-layer chipping (LINK) and using a black base to manage tonal variation (LINK). But there’s so much more that can be done.
Salt Fading
Salt is a great tool for any modeler interested in weathering. The best-known application is certainly salt chipping, which involves putting salt over a metallic base as something of a “layer mask”. Spray the top color, rinse away the salt, and viola, insta-chipping.
I actually used salt chipping with the prop, since the chipping fluid approach just didn’t yield the results I wanted.

The back of the prop was further weathered by scouring it with a stiff brush immediately after the paint went down.

But there’s another use for salt – fading. If you look at an aircraft operating in a harsh salt environment – at sea, or from primitive airfields in the Pacific – they tend to fade in an aggressive, splotchy manner. Salt is perfect for recreating this, whether you’re going for subtle or very pronounced.
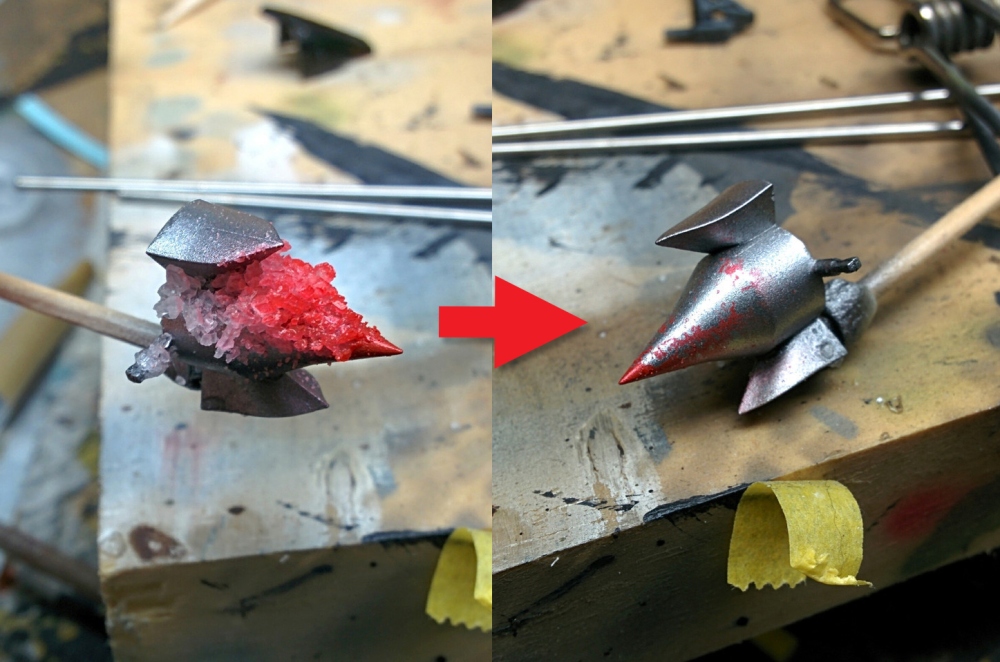
Salt fading is pretty simple. First, get some warm water. Not hot, just warm. You may need to add a tiny amount of dish soap to break the surface tension. You do not want the water to bead up on the surface, as then you’ll just get rings as the water evaporates and the salt remains.
Once the water is on – I prefer to use a spray bottle to mist it – apply your salt. A grinder of sea salt is a great way to go, since the coarser grains yield more interesting randomness. Just grind it on. You can use a hairdryer to help speed things along if you want.

Once the salt dries, go at it with a heavily thinned coat of a tan/gray color. This is very much a filter coat. You want a very light modulation effect, that’s all.
For types of paint, I’ve found Tamiya is rather poor as it seems to react with/absorb salt. Gunze Mr. Color and Testors Model Master enamels seem to work great.
Once the tan gray is down, rinse the salt off, reapply warm water, reapply salt, and go at it again, this time with a darker brown/gray “grime” mix. Same idea – heavily thinned. And then rinse the salt away again. The final result will look something like this if you use a very light hand.

NOTE: Salt has a weird tendency, even after being washed off, of “fogging”. This effect vanishes under a clear coat, as the below image demonstrates. Note the outer port wing, still fogged, while the inner wing and fuselage are clear.

Oil Dot Fading
After the salt fading was sealed with a light coat of Gunze Semi-Gloss, I moved on to oil dot fading. This process helps to tie everything together and subtly lighten and fade colors.

A key ingredient in this step is W&N’s Transparent White oil paint. It’s exactly what it says it is, and it makes an excellent lightening and fading agent.
Dots are applied across the airframe with either a toothpick or old airbrush needle, then worked into the surface with a round brush. Here you can see both stages.

After the oils are worked in, they are blended with a soft, flat brush. Move the brush in different ways. I find random swooshes and circles help to blend the oils without leaving streaks.
Here you can see the difference in the oil faded outer wing and the untouched inner wing.

On the underside, I also stippled raw umber and black oils to form a base for the exhaust staining.

Here’s the final result of the oil dot fading.

WORD OF CAUTION!
Try not to leave oils sitting overnight, even if it means working in sections. On another build, I had the oils cure before I could blend them, and it almost ruined the build. It was the first time it’s ever happened to me, but, well, it happened.
More to Come
Hang on for part 2, which will get beyond fading to actual dirtying!

link is missing for the page ref below.
Which page? Part 2? That’s because it’s not written yet.. 🙂
Great post. Looking forward to the next one Doog.
LOL. Part 1.
Link in email: https://doogsmodels.com/2014/11/10/weathering-tamiyas-132-f4u-1-corsair-pt-1/
Link I found: https://doogsmodels.com/2014/12/29/weathering-tamiyas-132-f4u-1-corsair-pt-1/
It seams there is a difference in the date within the URL. Or I’m completely wrong.
Yeah, for some reason it published with the date I originally started the draft…fluke thing I’ve never had happen before.
You do fantastic work. I would like to know on your tamiya 1/32 F4u-1 build when you did the weathering with the salt fading what color paint did you use for the tan/gray color and also the brown/gray grime color. Also you mention to heavily thinned the paint. What ratio did you use for this. I never tried this salt fading and I want to try this. Also what is a salt grinder and where do you get one at. Thanks.
Never tried the oil dot fading, but I’m going to on my Corsair I’m currently building. Question: Do I need to use any thinner when I go to swirl the transparent white? Or is it something that can be accomplished with a dry brush? Thanks in advance! This build has inspired me to try a lot of techniques I’ve never seen/tried before.
Dear Sir, Just found your website and also your youtube channel after restarted modeling again, (I was born in the Middle Ages) and also
like to know what tan/gray and brown/gray grime you used, please?
Kind Regards,