

The Combat Workshop‘s “Sprue Cutters Union” is akin to a group build, only with blog posts instead of builds.
This week’s topic:
Show us your photo studio
A few months ago, I wrote a post about the evolution of my photo studio, so it seems a bit silly to rehash the same ground.
Instead, I think I’ll use this space to give an overview of what I use now, how I use it, and why.
Let’s start with the all-important capture devices.
Cameras
Here’s the deal with cameras. You can take great pictures with a shitty camera. And you can take shitty pictures with a great camera. With the right know-how, basically any camera can be made perfectly acceptable for model photography.
That said, the right camera can make capturing the image the way you want a lot easier, and a lot less hit-or-miss.
What makes the right camera? Honestly, manual exposure controls. Modeling photography calls for settings that often lay well outside a camera’s auto mode, so it’s important to seek one out that lets you get things dialed in properly.
Beyond that, things get very subjective. Just like airbrushes or cars or golf clubs or whatever, at some point cameras come down to preference and feel. So if you’re shopping for one, don’t stress too much.
Nikon D300s
This is my main bench camera. Nikon’s D300s is one beast of a DSLR bristling with just about every option of manual control you can think of.

I recently acquired a full-frame D610, but I prefer the 300s for bench photography since the smaller APS-sized sensor makes it easier to capture a deeper depth of field (the larger the sensor, the shallower the depth of field).
I typically pair the 300s with Nikon’s excellent 35mm F1.8G lens. It’s cheap, but super-sharp, and the 35mm focal length and pretty close minimum focus distance makes it very workable for most models.
For settings, I usually shoot at f/22 with a shutter speed of 0.6 seconds. Given the settings, the 300s pretty much lives on a tripod, and I’ve set the self-timer to a two-second delay so I can get my hands away from it before it starts capturing the image.
Canon Powershot S90
I love my Nikon D300s, but it’s definitely a bit on the bulky side, and kind of a pain to drag out for at-the-bench shots. For the sake of convenience, I snagged a Canon Powershot S90 off eBay a while back.

A lot of people tend to crap on point-and-shoots because DSLRs must obviously be the better cameras, but this is just wrong. In fact, for model photography, the smaller sensor size of a point-and-shoot actually gives it an edge, naturally creating a deeper depth of field to keep more of the subject in focus.
Most point-and-shoots suck for an entirely different reason – a complete lack of manual control.
Entry-level and mid-tier point-and-shoots are designed for photo illiterates. You can turn off the flash and maybe lock in an ISO, but that’s about it. This might suffice for taking mediocre vacation pictures, but model photography calls for a vastly different settings that exist pretty far outside the capabilities of most auto modes (which will default to larger apertures and higher ISOs to maintain a higher shutter speed and reduce camera shake).
The S90 is different. It supports full manual control – aperture, shutter speed, ISO, the works. It also shoots in RAW, which is something I’ll get into later.
Personally, I prefer the Nikon for the “hero” shots, but the little Canon is probably 90% as good, and I think it actually outclasses the Nikon for the close-up macro shots.

The Phone Camera
I hate phone cameras, be it the camera on the iPhone or on the Nexus 5 I use nowadays. It’s the exact same problem that I have with point-and-shoots – the idiot mode that refuses to give you control over exposure or post-processing.
But I still use them anyway.

Why? Convenience. With a phone camera, I can quickly toss something up on Facebook, Photobucket, SmugMug and basically any online location I damn well please. It’s definitely a case of my laziness trumping my perfectionism.
Still, phone cameras tax me. They don’t capture detail as well. They have a hell of a time with metering and white balance. My Nexus 5 is a big fan of noise reduction which is industry terminology for “make this picture look like trash”.
One of my goals for 2014 is to rely on the phone camera less. Still working on it.
The Photo Table
I’ve already gone on at length about my photo table in this post from last summer, but here it is:
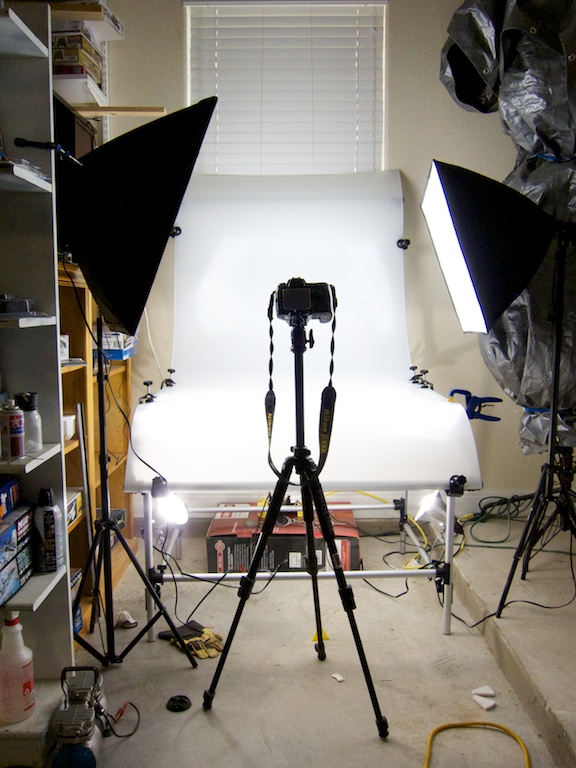
Prior to the photo table, I was shooting on posterboard backgrounds. The big difference with the photo table (aside from a lot more room for big subjects)?
Uplighting.
The translucent nature of the plexiglass means I can shoot light up through the surface to get a nice, even distribution on my subjects.


The only problem with the table is that sometimes the starkness of the white can “crush” the dynamic range, making subtle color modulations disappear.
When this happens, a black backdrop can still work wonders. Just…no uplighting.


Post-Processing
I grew up in the world of old-school analog photography, and back in those days learned that there was a lot more to creating a great image than just taking the picture. The darkroom played a huge role as well, giving you a chance to tweak exposure, use filters to enhance contrast, and so on.
The digital world is no different. I still rely on post-processing to tweak an image to exactly where I want it. For a long time, I used Apple’s Aperture software, but I’ve recently migrated to Adobe Lightroom 5.

Lightroom is where I do all of my processing and organizing. Shooting in RAW gives me all kinds of control once I get into Lightroom that I wouldn’t have if I just shot JPGs of everything. I’m not going to go into RAW vs. JPG here. Just…if you want to get serious about your photography, RAW is the way to go. And apps like Lightroom and Aperture let you take full advantage of RAW’s pure, lossless format.
Aside from the processing and organization, Lightroom is also awesome as a publishing engine. Through Lightroom, I can publish images to Facebook and SmugMug by literally dragging and clicking a button. Photobucket is a tiny bit more involved, but not really. And it still operates within Lightroom, beating the pants off of the “export to iPhoto, then export to Photobucket” workflow I had to suffer through with Aperture.
Check out what others are using
It seems to me that every modeler has a method to their own madness when it comes to photography. Here’s the rundown of how the others in the Sprue Cutter’s Union are capturing their works.

Long time subscriber, first time responder…
Mate, I really love your site and read it most avidly. There’s a beauty to both your modelling and writing style.
These ‘aside’ posts are great too and and give great information to a classic Back To Modeller with not much of a clue.
Keep up the good work, you’re a Geezer of Class
Dan, Brighton UK
Nice to see what I can aspire to in future. Before I take closeups I’ll have to make better models though ;0)
Great post and thank you for the tips i have certainly learnt something. I love your set up that is just awesome…Nice to know my point and snap is a good choice.
Cheers Shayne
Great post bud. I might well be asking your advice about DSLR’s at some point!