

Part I | Part II| Part III | PART IV
It’s time to wrap this puppy up! The 262 has been a long time building, and finally, in Part IV, it all comes to completion. Strap in – here we go!
Picking Up
In Part III, I walked through my technique for masking and painting the putty lines on the Me 262. The result exceeded my expectations:

Part IV promises to be a longer post, bringing the build to a conclusion, or very near to it. Buckle up, and let’s dive in.
Color
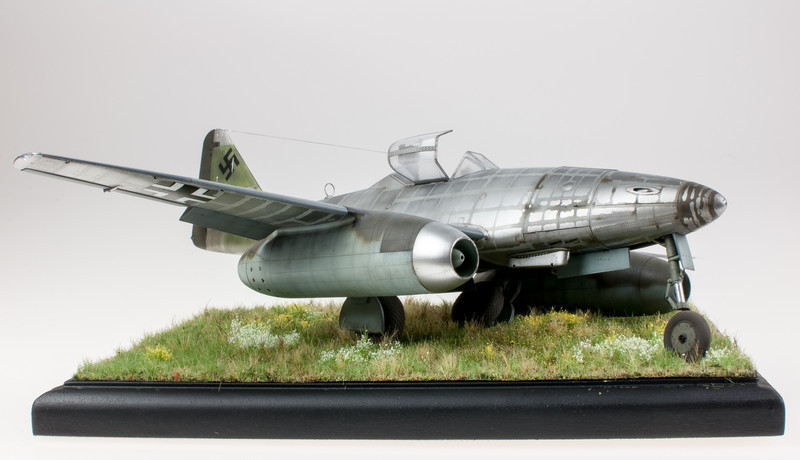
For the most part, this 262 was left in bare metal, but the tail, rudder and engine pods were all painted. This is in all likelihood the result of the production process, with subassemblies such as the engines arriving finished and ready to be bolted on to the airframe. It’s also entirely possible that one or more of the engines were stripped from another 262. There seems to have been a lot of cannibalizing going on toward the end of the war, and 111712 may even have been a victim of such practices itself. It’s not explained, after all, why one of its main gear struts was collapsed. It could have very easily been the removal of certain hydraulic components to keep another 262 operational.
Whatever the case, the engines called for RLM 81 on the topsides and RLM 76 down below. The tail is said to have been a lightly sprayed RLM 82, and the rudder was RLM 81.
For the RLM 82, I used straight Tamiya XF-5 Green, which is maybe a bit off if you’re doing full coverage, but worked fine for the light coverage I was going for. RLM 81 was a mix of Gunze RLM 81 and a few other colors, mostly browns and grays, since I find the base RLM 81 far too green. The 76 was straight-up Gunze RLM 76.
The photos of 111712 clearly show the starboard engine pod with a bare metal nacelle and a sharply defined RLM 81 access door just aft, so those were masked and sprayed accordingly.

Stencils
Once the colors were on, I shifted to the markings. 111712 wore few of them – little more than crosses and swastikas are visible. Rather than fight with decals over bare metal, I used Scale Precision masks. Easy peasy.
 After the upper crosses were on, I needed to tackle the underside insignia. Photos show that the underside balkenkreuz were the standard black/white style, and this is where Scale Precision’s mask design really shines.
With someone like Montex, you’d get the entire design as a single mask, and then you’d get to fight to keep the vinyl intact as you applied/lifted the appropriate elements. It sucks. With Scale Precision, the process is split between two masks. The first is just a fat, black cross. The second you line up inside the black. It might take a few tries to align everything, but this method avoids the “sloppy vinyl” syndrome I’ve experienced every time I’ve used Montex.


Masking can be a pain. But not this time!
Decals
After a coat of Gaia EX-01 Clear Gloss I placed the decals.
The decals for 111712 are not numerous – the 712s on the tail were sourced from a decal sheet included in an old Kagero Me 262 book (before they started having their sheets printed by Cartograf). They were thin, but super fragile and prone to folding over themselves. There are actually supposed to be four 712s, but I lost two in the application so…oh well.
The swastikas were taken from an Eagle Editions Fw 190D-9 sheet.

Dust Effect
After a second coat of Gaia to seal the decals, I moved into the weathering phase of the build. This is challenging with a bare metal aircraft, since “kind of weathered” is probably the hardest finish to pull off convincingly. At least to me.
This 262 was particularly challenging because the usual “hard use” doesn’t apply. I’ve found no evidence that this one ever even flew. So instead the weathering was focused around the general dust and crud that accumulates on something sitting outside. To replicate that, I turned to AK Interactive’s Dust Effects. I’ve never had much luck with AK’s stuff before, but after thinning it heavily with Mona Lisa Odorless Thinner, I dabbed it on and stippled it with some tight, black packing foam.

Later in the build, I also misted some AK Dust Effects onto the canopy.

Semi-Flat and Dark Dirt
Once the AK Dust Effects set, I hit the model with a “semi-flat” clear coat of Gunze Semi-Gloss and Flat clears, and then Flory’s excellent Dark Dirt wash. I prefer putting Flory over non-gloss finishes since it tends to leave some very subtle and interesting staining on the flatter surface.

Landing Gear

Next it was down below to sort out the landing gear. Brake lines were added out of wire and micro tubing, and the tire portions of the wheels were weathered with MIG Productions Russian Earth pigment.
Rigging & Streaking
Moving into the home stretch, I had to rig the radio aerial. Trumpeter didn’t make any provisions for this, so I had to make my own.


Streaks were added to the tai, engine pods and a few strategic areas using AK Winter Streaking Grime. Some bird droppings were also added with Vallejo Offwhite. The aerial wire was done using EZ Line painted Model Master Metalizer Magnesium.

Done!
After 76 days on the bench, a few finishing touches and last minute additions brought this one over the finish line.


But Wait!
With the 262 done, I turned my attention quickly to the outstanding Polak Model grass base, and accentuated it with some Mininatur flowers. Viola – the perfect base for a derelict Me 262.


And that’s a wrap on this one! Thanks for following along, and stay tuned for the next project!

Boom!!!!
Totally enjoyed following this build !!! That is one beautiful NMF !!!! And the weathering looks spot on to my eye.
Although doing something like this is not my “cup of tea”, this has been an amazing project to follow. I am a great believer that model building is a three dimensional art form (I am bias, I make a living building models) and this project really exemplifies that notion. Thank you again for sharing your project!
You’ll have to build more shelves to hold the trophies this one will win!
Absolute outstanding Doogs, your an inspiration!
That 262 looks fantastic! Great techniques all the way around, esp on the handling of the putty look.
Where did you pick up the Polak models base? Online? LHS? My base-building skills are… um… novice to say the least.
Being a WWII and Luftwaffe nut (and modeller) this build brings a tear to my Eye!
Absolutely fantastic build, wow!
Amazing..
A quick question though – you mention “After a coat of Gaia EX-01 Clear Gloss I placed the decals.”
EX-01 is white – do you mean EX-03?
This is a hell of a paint Job (and of course a Build) Great work, i am absolutely fan of your work. Next Project is a Me 262 with unpainted Wings and i just ordered the liquid mask from the US.
Best regards from Springtime Germany,
Matthias
Awesomely inspiring. I’m starting my own but I will go for a more classic finish. One thought I would probably incorporate in the build if I were you, would be to cannibalize the cockpit a bit, taking out some important and costly dials. For example the radio navigation and the ATI/artificial horizon dials!