
The garage photo studio got a huge upgrade last night. In fact, I’m tempted to go all Idiocracy and call it an “Upgrayyedd” (the double D’s are for a double dose of pimpin’).

Light Evolution
Back when I first got back into modeling, I had a very simple setup consisting of two clamp-style work lamps and a sheet of posterboard.

It worked well enough in 1/48, but even smaller 1/32 kits bumped up against the limited size of the posterboard, and I had to be careful how I shot to avoid running out of backdrop at the edges of the frame.

With the move in the fall of 2011, I upgraded somewhat, with a dedicated space in the new garage. This setup expanded to four lights, but the same old posterboard.

And in time came to incorporate a light tent.

This setup got me some great shots, particularly on black and silver backdrops, but running out of backdrop was still a big issue, particularly as I’ve been moving more and more into 1/32. When you start hitting wingspans of 15″ and up, a 20″ wide backdrop becomes somewhat limiting.

Going Big
So for Father’s Day, the better half gave me permission to splurge on a dedicated photo table…basically an aluminum tube frame supporting a 40×80″ sheet of slightly translucent plexiglass.
I got it built last night.
Overall, assembly wasn’t bad, but flattening out the rolled plexi was a pain. Working slowly and swearing a lot I eventually got it mounted to the frame. Then, after an epic session with the ShopVac to clear away spider webs and other debris, I got the new setup, um, set up.
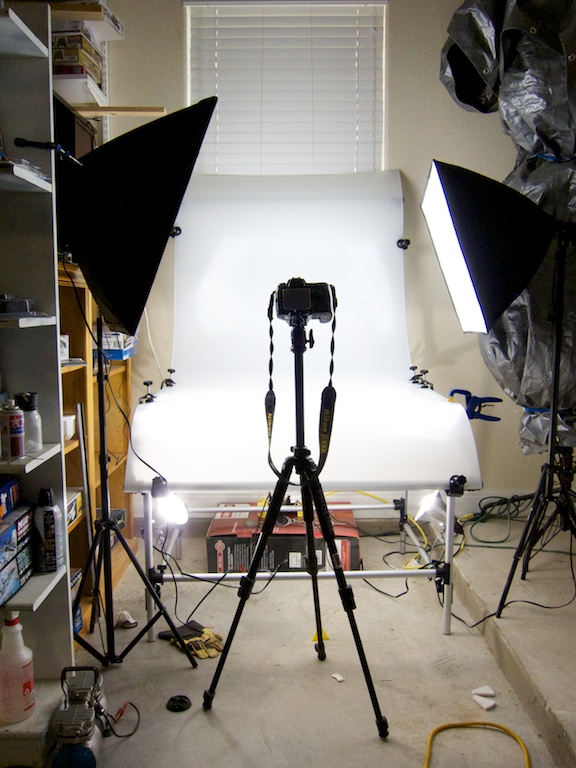
The diffuser bags on the main lights are awesome photographically, but big and annoying from a placement perspective. I had to get creative with the one on the right…

Underneath, the two work lamps soldier on, providing underside illumination.


As for the results…well…


The table is also big enough that I can photograph multiple subjects next to each other.

I still have some dialing in to do in places (namely white balance), but so far I’m in love. This table makes it easy to get killer shots, and it’s more than big enough for even larger 1/32 kits like the Hobby Boss P-61 or HK B-25 Mitchell. Goodbye, days of doubling up posterboards and killing the seamlines in Photoshop!

Makes it look like the Spitfire is floating. I like the slight reflection on the 38(t) and P47. Great idea about using the plexiglass and lighting it from the bottom.
Yeah, low angles give a slight reflection (or a lot if you ditch the underside lighting)…nice to be able to control the effect.
Nice setup. Thanks for the post, I’ve been trying to come up with a good photo studio solution for awhile and you’ve got some good idea’s here. Fortunately (though the detail you can accomplish in 1:32 is impressive), I won’t need a backdrop anywhere near as large as yours :-).
– Chris
Thanks for the comment Chris!
For a smaller version of the table, check out Cowboy Studio (via Amazon if you have Prime – free shipping). They have a smaller and cheaper version of essentially the same thing.
Great looking light booth setup Matt, and some great results already.
Nice models. For a change try using some reflector cards and one light, gives it a more 3D look. Also a black card to the (camera) right of the tank would give the edge more definition and 3D look, and use a polarizing filter to cut the reflection down or out altogether off the models, it will give it a more saturated and contrasty look for minimal outlay. I’m a photographer specializing in still life. Good stuff by the way. http://www.coreyrankin.com.
Corey
Thanks for the tips Corey! As it happens I need to head to the local photo store today to see if I can scare up a boom extension for the tripod, so I’ll have a look about grabbing some cards.
Reblogged this on Pure Truculence.
The photo setup is certainly impressive, but I won’t bother repeating what’s already been said praising it. Instead I want to comment on your models. They are beautifully done and weathered perfectly and realistically. Nice work!
I’m speechless! I’ve never seen photos of scale models looking so sexy. Awesome models as well, prime quality modelling skills.
Great work… I am looking at a similar setup for taking photo’s of electronics.
I got the cowboy studios version of this table. Setup nice and easy. However, we seem to be getting really dark photos. Our lights are bit different as we have the white umbrella difusers. Underlights are the same type. All have Daylight CF bulbs. Its possible we have settings on the camera wrong, along with it being an older camera. Do we want other light on in the room? Is there a preferred method to angle the lights? Lastly, is there a tip to eliminate the reflection? We would prefer to not have it, as we are using this to take product photos. Thanks!
Looks wonderful- I may have to upgrade.
One question though. What is your camera setup? I have a full frame Nikon and am looking for a lens that will give me 6-12 inches DOF at 5 (or so) feet. Up until now, I have only used focus stacking and it has issues…
Nikon D610 with a 60mm macro lens. The key is to crank the aperture waaay down. I shoot around f/22 or something. Then use a long shutter speed and either a remote shutter or self-timer to keep the camera from shaking.
Bit of a necropost but I’ve been reading your blog in the last few weeks, starting from your very first post. Can’t get enough of it! Your journey (though waaaaaay condensed by doing it this way) has been both fascinating and inspiring.
Anyway, I’m posting here as a photographer and wanted to compliment this setup but also ask you a question regarding aperture settings: It’s a complicated topic but do you find the image softens at all with aperture that narrow? There’s a phenomenon known as diffraction limited aperture (DLA) that causes the overall image to soften, due to the way the light has to bend with a very narrow aperture I’d always heard that anything beyond f/11 on most modern cameras would start to soften the overall image.
I’ve yet to test this thoroughly but f/22 sounds like it’d at least be something you could see. Any thoughts?