

Part I | Part II| PART III
It’s amazing how our tastes and interests change over time, isn’t it?
When I was a kid, the vast majority of the models I built were jets. Mostly 1/72 scale. It was only relatively late in the game – into junior high and high school, that I really started getting interested in World War II subjects. And even then, I kept building jets right up until I wandered away from the hobby. In fact, I’m pretty sure this 1/48 A-7E Corsair II was the last kit I completed in my first modeling “career”.

When I came back to modeling in 2010, I found I had no desire to build modern jets. None. Zero. Instead I found myself drawn to World War II and then Great War aircraft. Modern stuff, I figured, was all boring, naptime gray, and didn’t have the same historical import as subjects from the two most important conflicts of the 20th century.
Then, somewhere along the way, I began to get some small urges. I think Eduard’s MiG-21 line might have had something to do with it, or the glimpses of some stellar builds on various contest tables. I snagged a handful of modern 1/48 jets…but never touched them.
Last year, things came to a head. I decided that, damnit, I was going to build a jet. And more than that, I was going to build it in 1/32 scale. I even started accumulating a stash of 1/32 jets. Then I started working on Academy’s F-16I Sufa kit, and it was a slog from the start. Nothing went right, and I daresay it stole so much of my momentum that it kept me from at least one and maybe two more completions in 2013. After fighting it for something like two months, I finally said enough, and put it away in such disgust that I decided to abandon 1/32 jets and sell off my small stash of them.
Instead, I opted for 1/48 as my scale of choice for jets. Started snagging some kits with the proceeds gained from selling off the 1/32 stash, even.
And now that the Messerschmitt Me 262A-2a is behind me and the Challenger 1 is rolling toward completion, it’s time to finally buckle down and BUILD. A. JET.
Keep it Simple, Stupid
My problem with the F-16 was in part, I think, that there was just too much to deal with before I could get to what I consider the really interesting part – paint. So in my determination to build a jet, I opted for simplicity of construction as a leading consideration point in what to build.
And I ultimately decided on Trumpeter’s 1/48 MiG-21F-13.

The MiG-21 is basically a flying stick with some triangles grafted onto it, so, easy peasy, right?
The Scheme
At first, I was tempted to go with one of the kit-supplied schemes, a bare metal Finnish MiG-21.

But then I discovered this Polish MiG-21F-13…

Here’s what it looked like once upon a time…

For my build, I think I’m going to probably strike for a balance between these two. And…damn…the color matching is going to be quite the bear isn’t it? Either way, it’ll be an awesome testbed for extreme weathering. And is certainly guaranteed to look better than the “restoration” job…

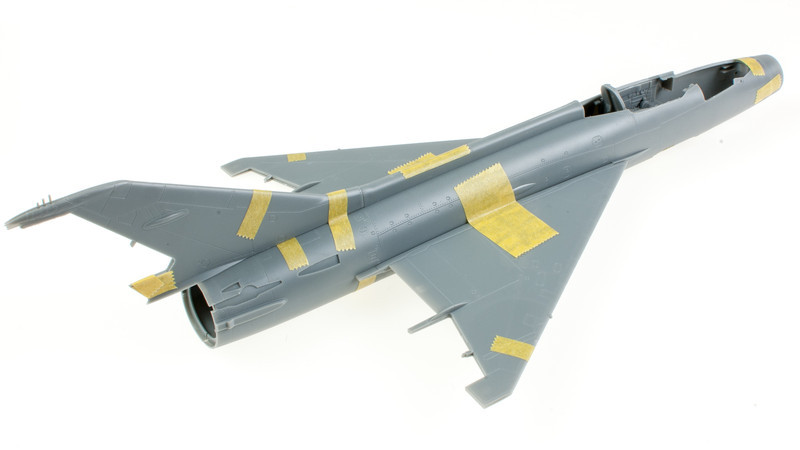
Test-Fit
Every build (at least every Trumpeter build) begins with a test-fit. Overall, the fit of the MiG-21F-13 is quite good.

The major pain points I discovered aren’t even fit-related. They’re engineering related.
The first is the horizontal stabilizers, which are butt-jointed. There’s no pin, tab, slot or anything. Really, Trumpeter? I might expect that of a limited run manufacturer, but for a mass production kit, that’s just lazy.
The second is the wings. These mate to the fuselage with two tiny pins. Hello! They aren’t missile pylons.
One area that exceeded my expectations? The canopy. I’m planning to do this one with the glass closed, to match the various reference pics, and am happy to report that it fits up very well in the closed position.

First Up
Usually an aircraft build starts in the cockpit, but this time around I changed things up somewhat, and started by masking off the canopy first. I’m happy to report that Eduard’s mask set fits really, really well in this case.

Time for Paint
I got the cockpit ball rolling my usual way, with a primer coat of Mr. Finishing Surfacer 1500. The black creates a nice base that brings out more variation and contrast in the top coat.

For the cockpit color…well…let’s call it a shot in the dark. Later MiG-21s all sport the distinctive Soviet Barf Turquoise cockpit, but the F-13 is a mish-mash. You can find (usually updated or restored) examples in “SBT”, but you can also find bluish gray, medium gray, and black. So honestly, who knows?
Ultimately, I opted for a medium gray, and used Tamiya’s Dark Sea Gray color for the cockpit, gear bays and gear struts.

Details + Weathering
Details in the cockpit were picked out somewhat on the basis of reference photos, and somewhat using a criteria of “this would look cool”.
First up was a quick detail paint of the consoles, seatback and a few select switches. Then everything received a drybrushing of Model Master Dunklegrau and Aluminum to give a sense of wear.

This was followed with the completion of the Eduard PE seatbelts (not great, but passable) and a heavy application of Vallejo Game Color Black and Umber washes.

Next came the instrument panel. While I technically had Eduard’s PE set, it asked for more commitment than I was willing to give to make the PE instrument panel work, including hacking up the cockpit tub and excluding clear instructions.
So…I decided to use the kit panel instead, and make due with a mix of kit decals and Mike Grant IP gauge decals, all punched out with my micro punch set. Tedious…tedious work.
After the last went down, I did some picking out of switches and such inside the cockpit.

After the decals were done, they were treated with clear gloss and everything sort of came together.


Now, at this point, the cockpit is complete, but the HUD deck still has some work that’s needed. But…that work will come a bit later in the build, so I will save it for that point.
Overall, I think Trumpeter’s put together an entirely competent cockpit here. If you’re building this kit like me, almost on a lark, then I think you’ll be pleasantly surprised. But I’ve also heard very, very good things about Neomega’s resin replacement.
Now, if somebody would just put some effort into comprehensive decal options for the MiG-21F-13. Come on, aftermarket…
Next up…main assembly.

Just curious…..do u spray a clear coat to protect the acrylics before u apply the wash to ur cockpits? Or do u apply was directly to it?
By the way – love the site….u make model building look so easy….keep up the great work!